C4D Live Bridge
What this plugin can do
Send video VIDEO OUT
Send the Cinema 4D viewport, just as you see it, to other apps in real time. Stream with OBS, composite in Resolume, work with UE5: connect it to whatever you use.
Bring video in VIDEO IN
Show an After Effects comp or a live camera feed as the C4D viewport background in real time. Design checks and layout work get much faster.
Remote control
Control Cinema 4D from a web browser. Playback, camera switching and parameter tweaks, all from the device in your hand. To connect, just scan a QR code.
Sync with AE AE EXTENSION
Install the bundled After Effects extension (.zxp) and the Cinema 4D and After Effects timelines sync in both directions (whichever one you operate, the other follows). Combined with VIDEO IN, you can build 3D CG with your AE comp as a background guide.
MIDI input
Turn the knobs and hit the pads of a standard MIDI controller to change values in C4D. A hands-on way to perform live or to animate.
Camera Sync (output)
Send the position, rotation, focal length and more of a Cinema 4D camera over OSC in real time. A camera in external software such as TouchDesigner can then move exactly like the one in C4D.
Requirements
Windows
| OS | Windows 10 (version 1903 or later) / Windows 11 (64-bit) |
| Cinema 4D | 2026.2 or later Does not load in 2026.0 / 2026.1, 2025 or earlier, or 2027 |
| GPU | DirectX 11 compatible |
| Network | Same LAN as the receiver |
| Output | NDI / Spout (both at once possible) |
| NDI | Runtime bundled (nothing extra to install for C4D) |
| AE sync | After Effects 2024 / 2025 / 2026 |
macOS
| OS | macOS 15.5 (Sequoia) or later |
| Cinema 4D | 2026.2 or later Does not load in 2026.0 / 2026.1, 2025 or earlier, or 2027 |
| CPU | Apple Silicon (M1–M4) (Intel Macs untested) |
| Network | Same LAN as the receiver |
| Output | NDI / Syphon (both at once possible) |
| NDI | Runtime bundled (nothing extra to install for C4D) |
| AE sync | After Effects 2024 / 2025 / 2026 |
Installation
C4D_Live_Bridge_1.0.0_C4D2026_win.zip (on Mac …_mac.zip; the demo has _demo in its name). Inside you'll find 00_START_HERE.html (install steps), the C4D_Live_Bridge folder (the plugin) and the AfterEffects_Sync folder (the After Effects extension).Win:
C:\Users\<user name>\AppData\Roaming\Maxon\Maxon Cinema 4D 2026_XXXXXXXX\plugins\Mac:
~/Library/Preferences/Maxon/Maxon Cinema 4D 2026_XXXXXXXX/plugins/If there is no plugins folder, create one. You can open this location from Cinema 4D's Preferences → "Open Preferences Folder...".
Check that you copied the ZIP contents as a whole folder.
If
plugins/C4D_Live_Bridge/ contains C4D_Live_Bridge.xdl64 (Win) / C4D_Live_Bridge.xlib (Mac), you're set.If it still doesn't appear, check that Cinema 4D is 2026.2 or later and that you copied the folder into the
2026_XXXXXXXX folder you actually use (Preferences → "Open Preferences Folder...").
• The first time you press LIVE, macOS asks for Screen & System Audio Recording permission. Turn Cinema 4D on in System Settings → Privacy & Security → Screen & System Audio Recording (you may need to restart Cinema 4D). Without this permission, LIVE stops and shows "LIVE stopped (capture failed)".
• To exchange NDI with another computer, you also need Local Network permission (also under Privacy & Security, turn Cinema 4D on). If it still doesn't work, turn it off, restart the Mac, then turn it on again.
• On Windows, if Windows Security asks the first time, allow Cinema 4D on private networks.
Quit Cinema 4D, delete the old C4D_Live_Bridge folder, then copy in the new one. Your settings are kept.
The demo has every feature, but the NDI / Spout / Syphon output and the VIDEO IN background carry a "DEMO" watermark (in the four corners and the center). The panel title reads "C4D Live Bridge (Demo)". To switch to the full version, replace the C4D_Live_Bridge folder with the one from the full version.
The panel at a glance — four tabs

The plugin panel is split into four tabs by function (VIDEO OUT / VIDEO IN / OSC / MIDI). The features of all four tabs run at the same time: switching tabs doesn't turn anything on or off.
The Menu at the top left holds "About...", "Manual..." (this page) and "Language" (English / Japanese; reopen the panel after switching).
The screenshots in this manual show the Japanese UI; you can switch the panel language in Menu → Language (English / Japanese).
OUT
over NDI / Spout / Syphon
IN
as the C4D viewport background
and OSC communication
• Closing the panel does not stop LIVE (streaming). To stop it, reopen the panel and press LIVE.
VIDEO OUT tab — send video out
The basics in two steps
- Choose an output — NDI / Spout / NDI+Spout (on Mac: NDI / Syphon / NDI+Syphon). By default, both are sent at once
- Press the LIVE button in the middle — that's all it takes to start streaming
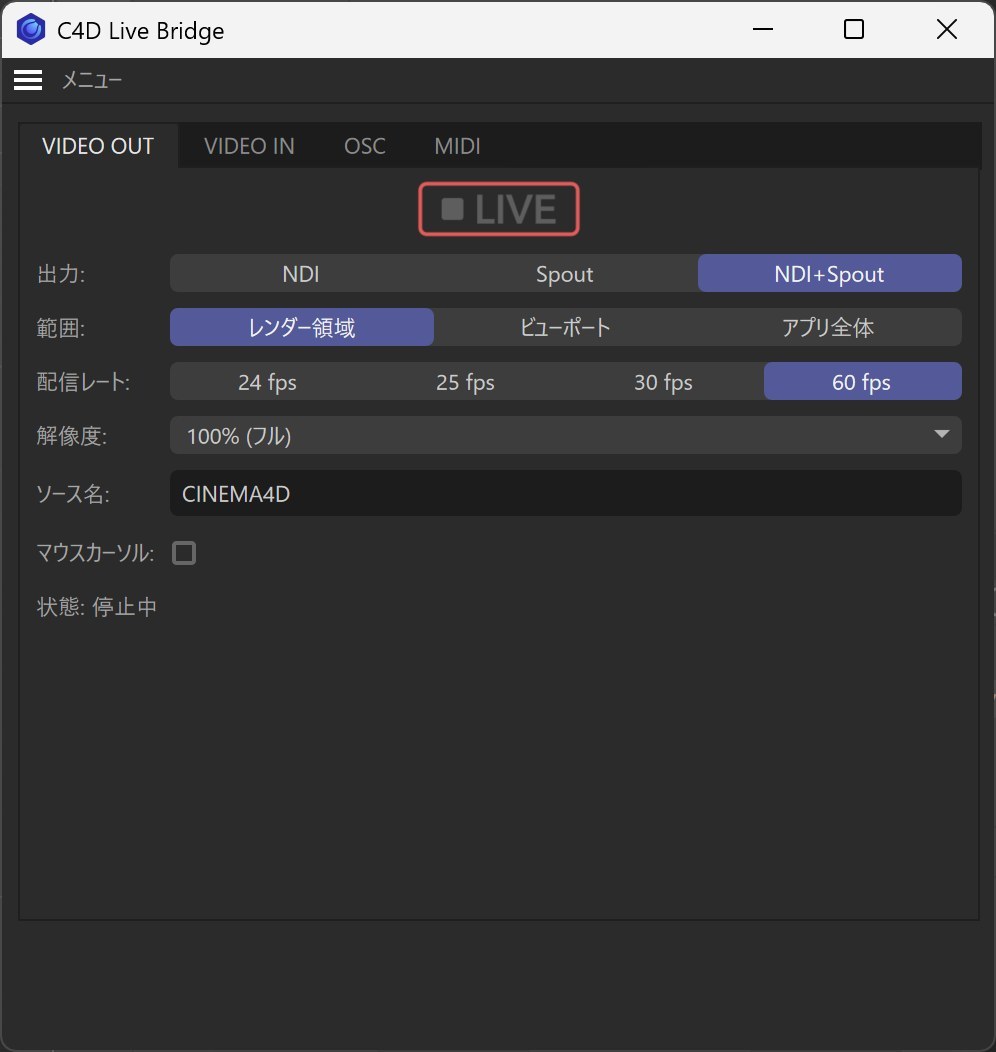
This tab sends the Cinema 4D viewport to other apps over NDI / Spout / Syphon. Choose an output and press the LIVE button in the middle, and streaming starts.
Reading the LIVE button


CINEMA4D) in OBS or another receiver to see the stream. NDI receivers list it as "COMPUTER-NAME (CINEMA4D)".VIDEO OUT tab — what each setting does
| Setting | Description |
|---|---|
| Output | The format used for sending. NDI works over the LAN, Spout within the same Windows PC, Syphon within the same Mac. The default is NDI+Spout (Mac: NDI+Syphon), which sends both at once. |
| Scope | The area of the screen to send. Render area (default): the frame in the viewport that matches the Render Settings aspect ratio, sent at the Render Settings resolution Viewport: the whole viewport at its on-screen size Application: the entire Cinema 4D window, menus included |
| Stream rate | Frames sent per second: 24 / 25 / 30 / 60 fps (default 60). It is set independently of the scene frame rate. We recommend 30 for streaming and 60 for VJ work or fast motion. |
| Resolution | Scale of the output size: 25% (lightest load) / 50% (balanced) / 75% / 100% (full) (default 100%). If things feel heavy, dropping to 50% lightens the load. Note: in the current version this works on Windows only (macOS always sends at full size). |
| Source name | The name receivers show when you pick a source. When sending from several computers, use names you can tell apart. |
| Mouse cursor | Whether the mouse pointer appears in the output. For streaming, it's usually best to leave it off. |
Use case 1 — projection mapping prototypes and previews
Why this combination works
- Move a model in C4D and the projection updates on the spot (no video export needed)
- You can check right away whether the shape, scale and color of the projection are what you intended
- Ideal for setting the direction, prototyping and exploring designs early in a project (final delivery uses a separate workflow, such as baked video)
Use case 2 — studio compositing
Layer the camera feed from the shoot and Cinema 4D CG in compositing software, and check the final look while you shoot.
To do it all inside C4D, see also using VIDEO IN and VIDEO OUT together.
(CG / background / effects)
Resolume · vMix · Aximmetry · TouchDesigner
(shared by talent, director and crew)
(live footage of the talent)
Choosing compositing software
- Green screen shoots: key C4D CG into the background instantly → check it on set
- Streaming switchers (vMix / Wirecast) → take the NDI input directly into a live broadcast
- Virtual production tools (Aximmetry / Disguise) → xR / LED wall setups
- VJ / free-form compositing → Resolume / TouchDesigner / Notch are the usual choices
VIDEO IN tab — bring external video in as a background
Shows NDI video coming from the same network as the Cinema 4D viewport background, in real time.
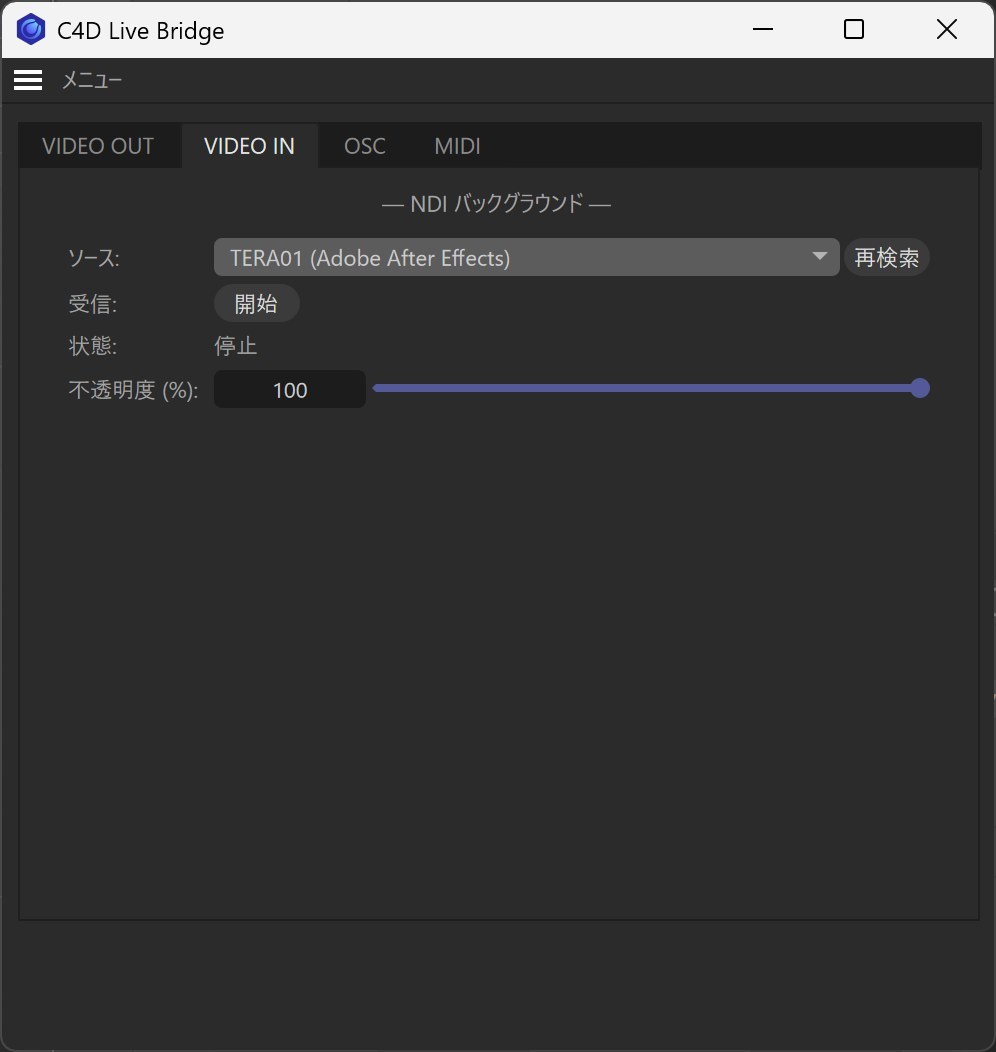
Pick an NDI sender found on your network from the list and press "Start": its video appears in the Cinema 4D viewport background in real time. This tab is also where you adjust opacity and color, and take snapshots that freeze a frame you like.
Three steps
- Choose a source — pick an NDI sender found on the network from the list
- Press "Start" — when the status shows "Receiving: <source> (recv N fps)", the video is in the viewport background
- Adjust the opacity — around 50–80% works well when you want to balance it against the CG
What each setting does
| Setting | Description |
|---|---|
| Source | List of NDI senders found on the same LAN. Update it with the Refresh button. The first entry is "(Select NDI source)"; when no source is found at all, the list shows "(no NDI sources found)". "Remote Connection N" entries are listening slots from NDI Tools and carry no video. |
| Start / Stop Receive | Starts / stops receiving the selected source. Once pressed, the button changes to "Stop". The status shows "Receiving: <source> (recv N fps)" while receiving and "Idle" when stopped. |
| Opacity (%) | How strongly the video shows as the viewport background. 100% fully replaces the background; lower values let you check how it blends with the CG. |
| Color | "Compensate viewport color transform" (on by default). Shows the received video in its original colors. Keep it on while the viewport's "Linear Workflow Shading" is on. |
| Snapshot | Saves the current frame, up to 10 frames. Click a thumbnail to show that frame, frozen, as the background. Right-click to save it as PNG or delete it. |
VIDEO IN — uses and combinations
Why feed external video into C4D? Here are two typical uses.
① Show an After Effects comp in C4D
Install the free NDI Tools on the computer running AE, and you can send the comp you're working on over NDI as is (in AE's Preferences → Video Preview, turn on "Mercury Transmit" and choose NDI as the output). Receive "COMPUTER-NAME (Adobe After Effects)" in Cinema 4D's VIDEO IN, and you can build your 3D scene with the AE design in the background.
On jobs where you place CG over titles or graphics, the export-and-import loop goes away.
② Bring in live camera video for layout
Bring in camera video from a studio or location shoot (from NDI-capable gear or through an NDI converter) and check the layout while placing CG over the live footage. Useful for matching a CG car to a real landscape or placing product CG on a real set, for example.
VIDEO IN + VIDEO OUT work at the same time
You can composite the incoming external video with Cinema 4D CG in the viewport and send the result out again as another NDI stream with VIDEO OUT.
AE / cameras / other PCs
shown as background
(rendering)
re-sends the composite as NDI
preview monitor, etc.
AE timeline sync
Install the bundled After Effects extension "C4D Time Sync" and the Cinema 4D and AE timelines sync in both directions (whichever one you operate, the other follows).
Combined with VIDEO IN, you can build 3D CG with your AE comp as a background guide.
What is it?
Strictly speaking, it isn't part of C4D Live Bridge itself. It becomes available once you install the After Effects extension bundled with the plugin (C4D_Time_Sync_0.7.1.zxp in the AfterEffects_Sync folder) in AE.
AE receives the OSC sent by the plugin and sets the comp time to the C4D frame. In the other direction, when you move the timeline in AE, it sends that position back to C4D's "OSC Input" (two-way sync).
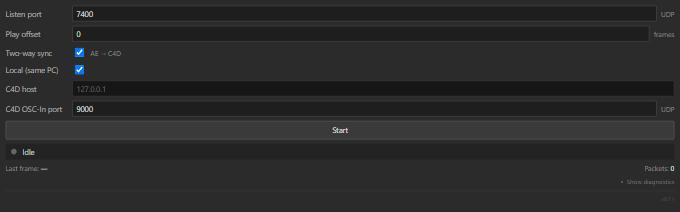
Panel fields
| Listen port | UDP port that receives OSC from C4D. Default 7400. Match it to "Target Port" under "OSC Output" on the C4D side. |
| Play offset | Number of frames that makes up for the delay before AE's RAM preview starts when you start playback in C4D. Default 0. If AE lags slightly during playback, try 3–10. |
| Two-way sync | Sends the timeline position you move in AE to C4D (AE → C4D). On by default. |
| Local (same PC) | On when C4D runs on the same computer (default; sends to 127.0.0.1). For another computer, turn it off and enter the C4D computer's IP in C4D host below. |
| C4D OSC-In port | Target port for AE → C4D. Default 9000. Match it to the port of C4D's "OSC Input". |
| Start / Stop | Starts / stops receiving. When the dot turns green and shows "Listening on UDP 7400", it is waiting for data. |
| Last frame / Packets Diagnostics | The last frame number received and the total packet count. Rising values mean the signal is arriving. Open Show diagnostics for more detailed counters. |
What gets synced
| Item | Cinema 4D | After Effects |
|---|---|---|
| Play / Stop | ▶ / ■ buttons or Space | Plays / pauses at the same moment |
| Frame position | Drag the timeline, jump frames | The current-time indicator follows |
| Start / End | Go to start / end | Jumps to the same frame number (the start / end if the scene and the comp have the same length) |
| AE → C4D (keys) | C4D follows to the same frame immediately | ← → / Page Up / Page Down / typing a time value |
| AE → C4D (mouse) | Matches the position where you release the mouse | Drag the timeline (nothing is sent while dragging; this is how AE works) |
Installing and enabling
C4D_Time_Sync_<version>.zxp from the AfterEffects_Sync folder onto the window of the free ZXPInstaller (aescripts.com/learn/zxp-installer). If an "Unknown publisher" warning appears, continue with "Install Anyway" / "Continue". Restart After Effects after installing.• If the installer reports that the extension is invalid, you may need to enable PlayerDebugMode (steps in
AfterEffects_Sync/README_Eng.txt).• If Start shows "Port 7400 is already in use", quit the other app using that port, or set both AE's Listen port and C4D's Target Port to another matching number (for example 7401).
Recommended combo — build 3D CG over your AE comp
This works best together with VIDEO IN. Bring AE's NDI output into the C4D background and sync the timelines, and you can build CG using your AE comp as a guide.
(NDI Tools + Mercury Transmit)
shown as viewport background
timeline control
follows whichever side you operate
Where it helps
- CG over title / logo animation — fine-tune the 3D to match the AE typography
- Product CG over a live-action plate — place and animate the product over the AE background
- Work out camera moves in C4D while watching a storyboard / animatic
OSC tab — external control
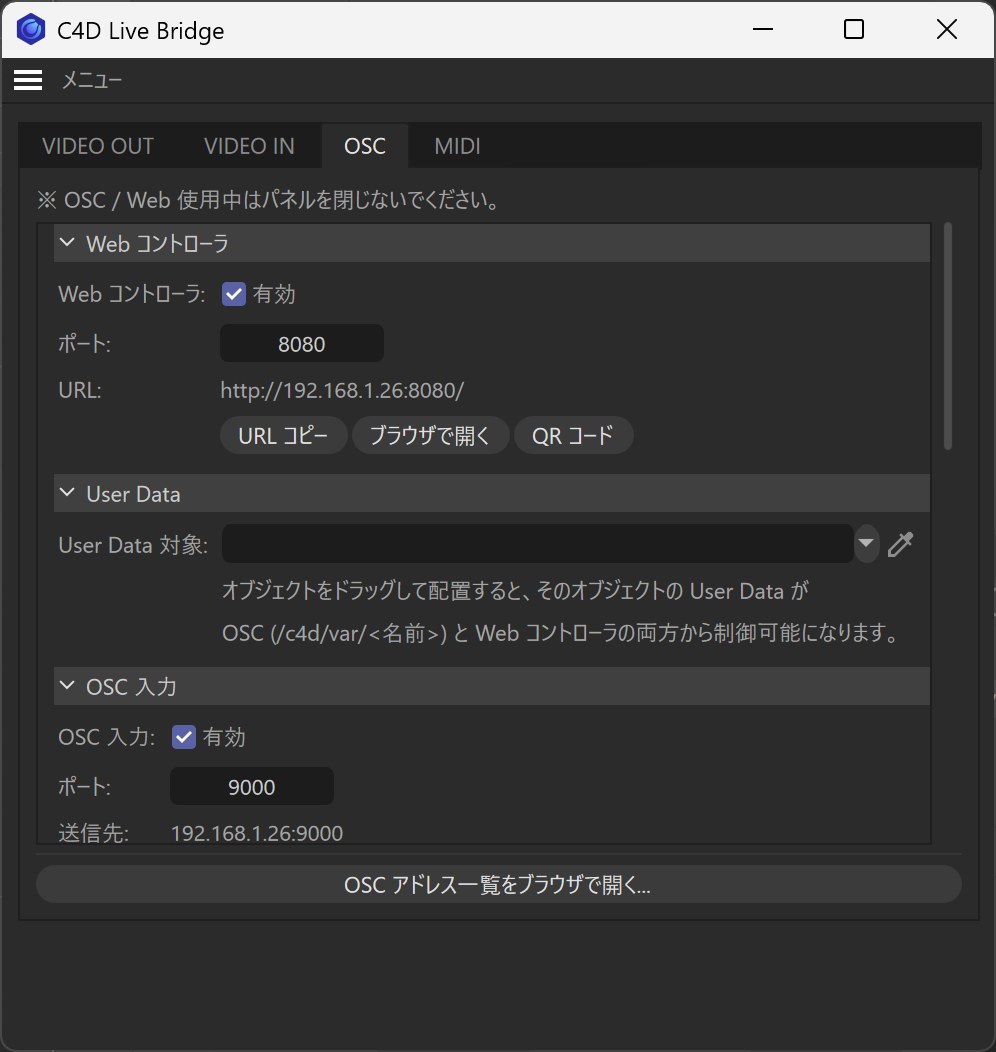
This tab is the starting point for controlling Cinema 4D from outside. It has six sections: "Web Controller", "User Data", "OSC Input", "OSC Output", "Camera Sync (output)" and "Recording" (click a title to open or close it).
At the bottom of the tab, "Open OSC Reference (in browser)..." shows the list of available OSC addresses (in English).
The six sections of this tab
Web Controller
Starts a dedicated UI that opens in a browser. Connect from a phone, tablet or another computer. Show the QR code and your phone becomes a remote with a single scan.
User Data
Drag an object from the scene to register it, and its User Data can be controlled from both the Web Controller and OSC.
OSC Input
Receives commands such as "play" or "switch camera" from QLab / Resolume / TouchOSC and others. The default port is 9000. "Send OSC to" shows the IP:port to enter in the other app.
OSC Output
Sends C4D's state (is it playing? which frame? and so on) back out. Use it to share state with a switcher, or for AE timeline sync.
Camera Sync (output)
Sends the position, rotation, focal length and more of a chosen camera over OSC, so a camera in external software can move the same way as in C4D.
Recording
Records incoming User Data changes and camera switches during playback as keyframes.
OSC tab — control User Data remotely
What is User Data?
A standard Cinema 4D feature that lets you add your own sliders, colors, checkboxes and more to an object. Combined with XPresso, a single button can change the lighting or switch animations.
Register in three steps
/c4d/var/<name>Supported User Data types and how they appear
| Type | Web Widget | OSC Example |
|---|---|---|
| Real / Integer | Numeric slider | /c4d/var/Light_Power 0.75 |
| Boolean | ON / OFF toggle | /c4d/var/FX01 true |
| Color | Color picker | /c4d/var/Mat_Color 0.2 0.6 1.0 |
| Vector | Three sliders for X, Y and Z | /c4d/var/Offset 0 1.5 0 |
| String | Text field | /c4d/var/Title "Hello" |
Turn REC on and move User Data while Cinema 4D is playing, and the movement is recorded as keyframes (nothing is recorded while playback is stopped). Your live moves are kept as animation. REC in the Web Controller is the same switch as "Recording" → "Record User Data" in the panel.
Web Controller — turn your phone into a remote
- Open the OSC tab — select the OSC tab in the plugin panel
- Enable the Web Controller — the server starts as soon as you check "Enable" (the default port is 8080)
- Show the QR code — the QR Code button displays a QR code. Scan it with your phone's camera
- Open it in a browser — the Web Controller opens on your phone. On another computer, use Copy URL and paste the URL into a browser (on this computer, use Open in Browser)
?k=…, so only devices that know the key can control Cinema 4D (the panel shows it shortened). Press URL Reset to the right of the URL to get a new URL / QR code; the old URL then stops working (it shows "Access key required").
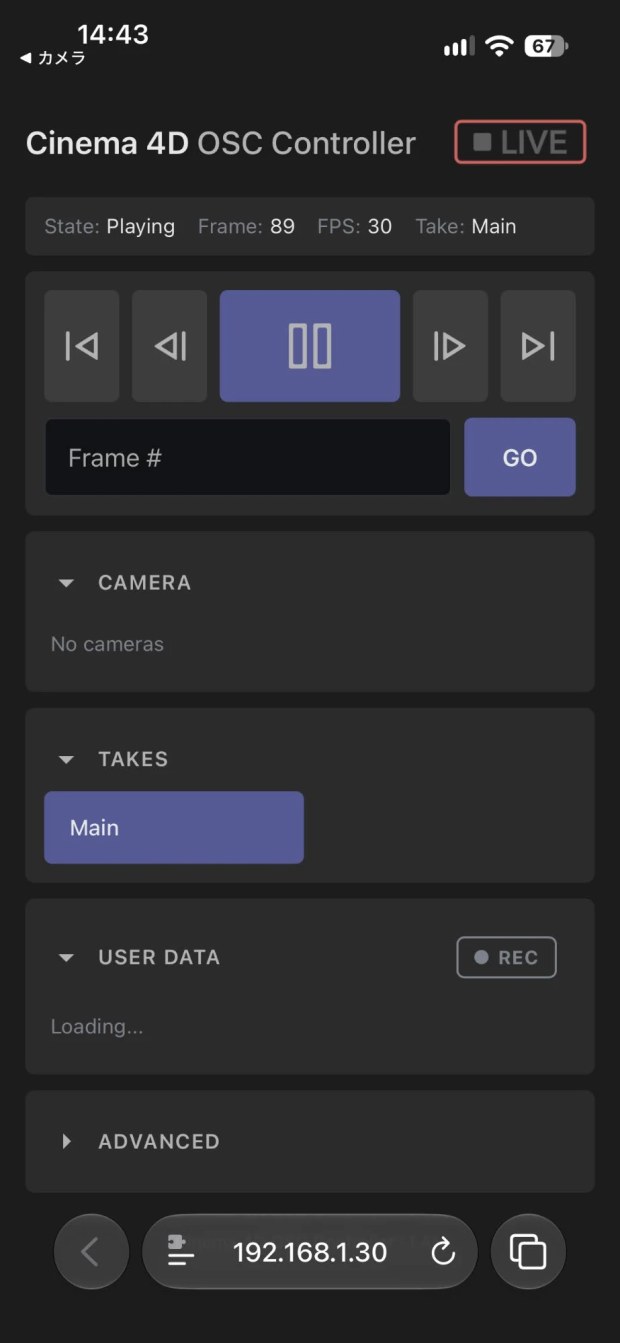
Web Controller layout
① Playback controls
Five buttons (go to start / back one frame / play-pause / forward one frame / go to end), plus a frame number field: enter a number and press GO to jump. The LIVE button at the top right also turns VIDEO OUT streaming on and off.
② CAMERA / TAKES
Lists the cameras and Takes in the scene. One tap switches between them, so you can even use it for live switching.
③ USER DATA
Shows all the User Data of the object registered in the OSC tab. Change numbers, colors, on/off switches and text in real time.
④ ● REC button
Changes you make to User Data during playback are recorded as keyframes automatically. You can create animation as if you were recording a take.
⑤ ADVANCED
Step through object selection / switch documents / skip to markers / switch the shading mode / turn Geometry Only mode on and off.
OSC tab — advanced features
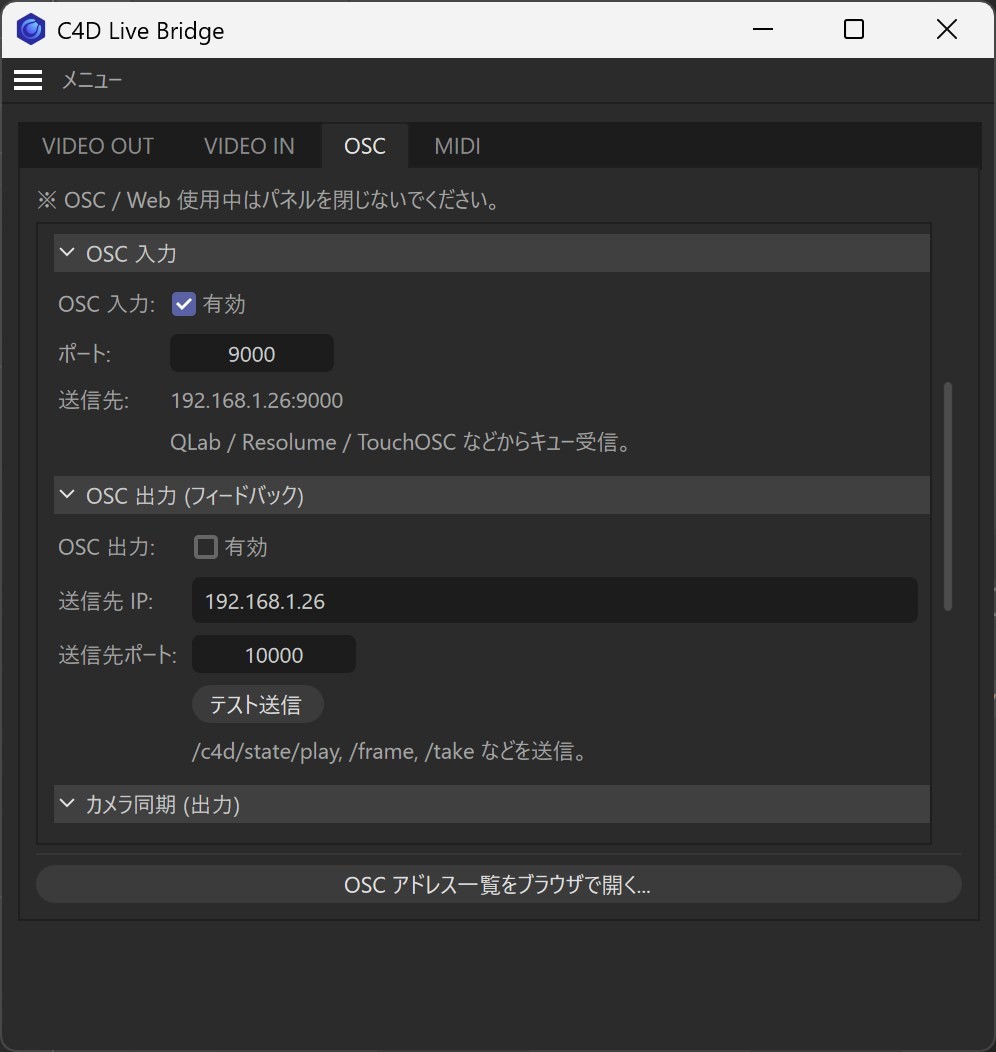
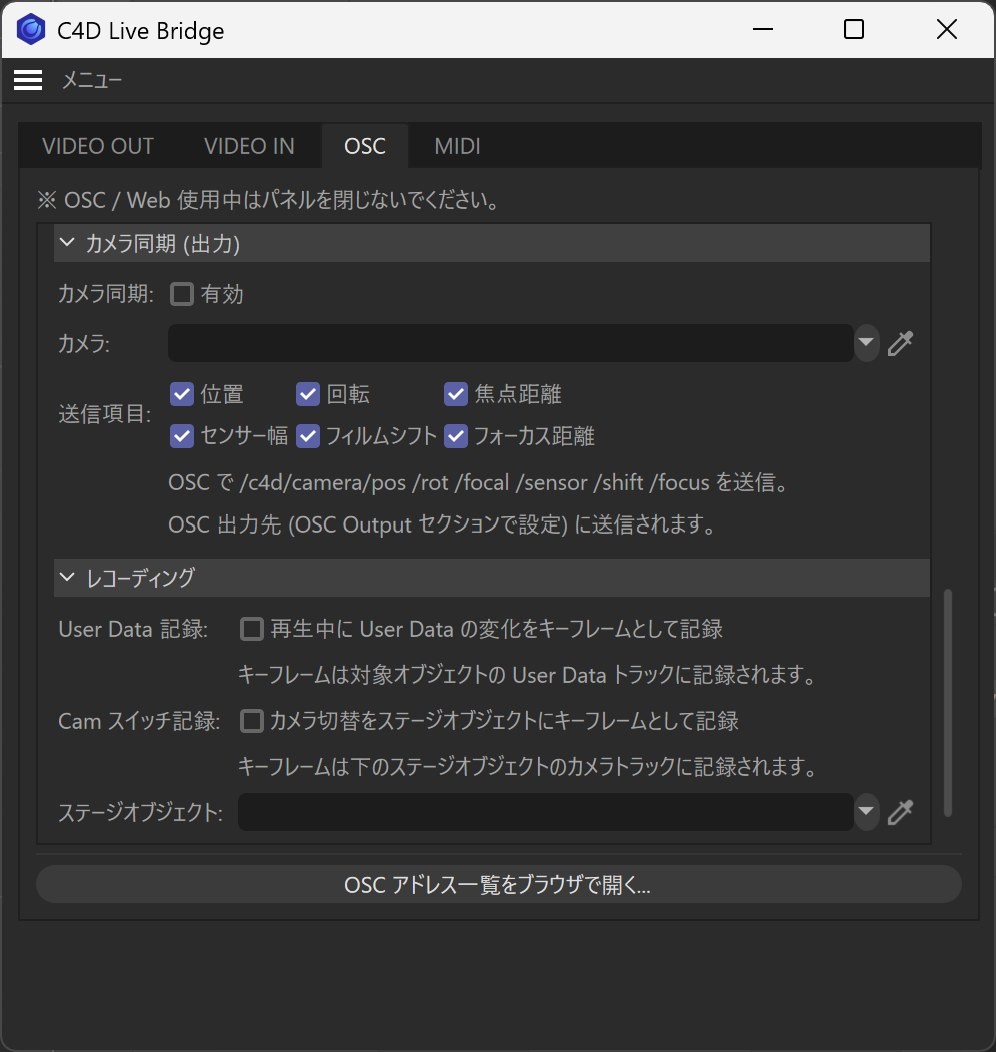
OSC Output
Sends C4D's state to external apps. For example, a switcher can receive "now at frame 240" and "playing" and sync other video to it: a setup made for live production. With "Local (same PC)" on (the default), it sends to 127.0.0.1; to send to another computer, turn it off and enter the IP. The default Target Port is 9001. Use Send Test to check that messages arrive.
Camera Sync (output)
Sends the position (m), rotation (degrees), focal length, sensor width, film offset and focus distance of the camera set in "Camera" to the "OSC Output" target (OSC Output must be enabled). Use it to make a camera in TouchDesigner or similar software move the same way as in C4D.
Recording
Turns your live moves into keyframes automatically, so they stay in the scene as animation.
- Record User Data — records incoming User Data changes during playback as keyframes
- Cam Switch — records camera switches (the Web Controller's Camera buttons or
/c4d/camera/active) on the camera track of the Stage object set in "Stage Object"
MIDI tab — translating MIDI into OSC
MIDI devices don't drive C4D directly: their input is converted into OSC commands.
How it works
CH1 · CC #21(converted by the table)
/c4d/var/Light_Power 96For each knob, you decide in a table which OSC address it translates to. This is called channel mapping: a table of which input channel (knob) goes to which destination (OSC address).
Note: CC / Velocity / Pressure values are sent as is, from 0 to 127. To work with 0–1, set the User Data range to 0–127 or convert the value with XPresso or similar.
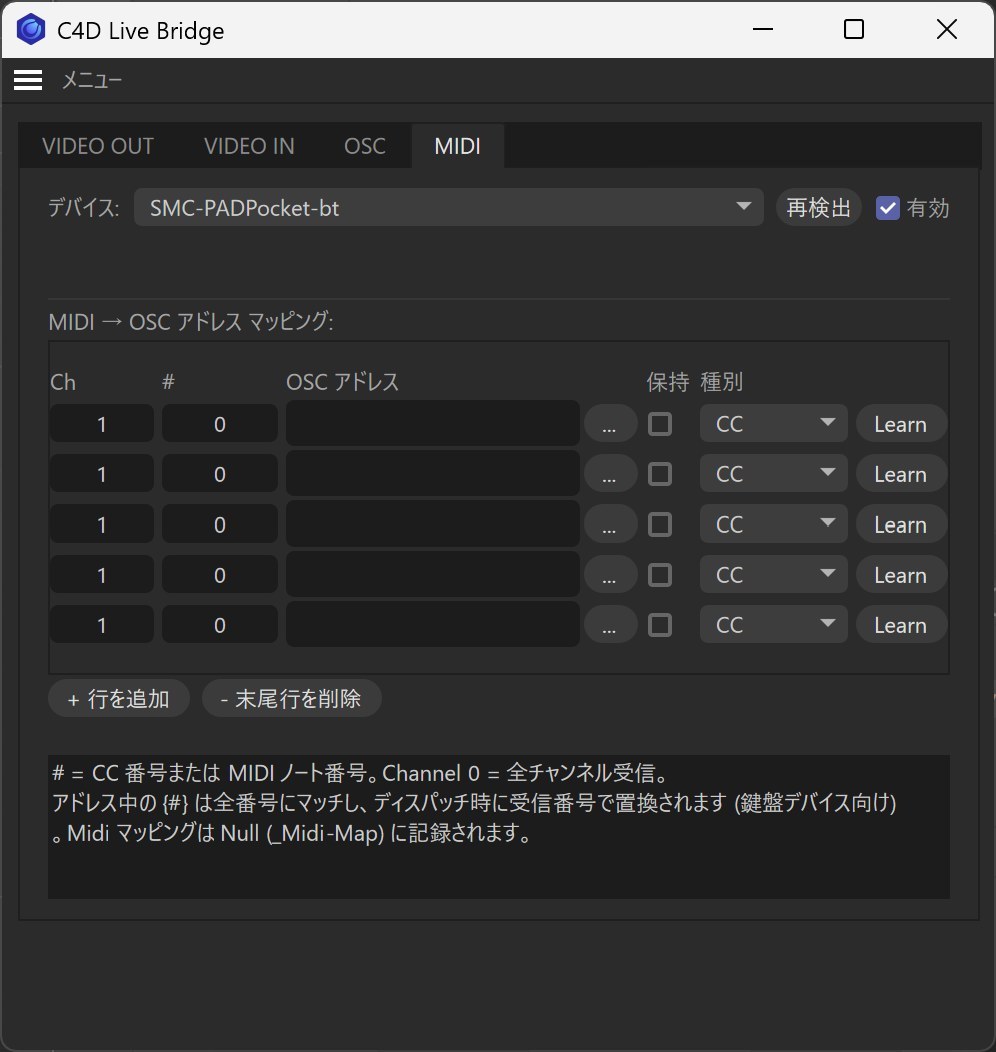
This tab connects a USB MIDI controller to Cinema 4D. Press the Learn button in a row of the mapping table and move a knob or press a button: Ch / # / Type for that row fill in automatically.
Setup
/c4d/var/Light_Power. You can also pick one from a list with the ... button (for example Transport: Play, LIVE: Toggle)| Setting | Description |
|---|---|
| Type | CC / Note / Velocity / Pressure. |
| Hold | Used in Note / Velocity rows. Off (default) sends 1 when you press and 0 when you release. On sends only when you press (a trigger for Note, the strike velocity 0–127 for Velocity). |
| Ch | 0 receives on all channels. |
| {#} | Put {#} in an address to match every number; it is replaced with the incoming CC / note number (for example /c4d/key/{#}, for keyboards). |
Mappings are saved on a Null object named _Midi-Map in the scene. As with OSC, keep the panel open while you use MIDI.
Glossary 1: what is NDI?
A standard for sending video to other apps or computers over a network.
The industry standard for sharing video between computers on the same network.
It's used by major broadcasters and streaming studios. It works over wired LAN or Wi-Fi and lets computers and apps share video without HDMI cables.
Receiving software that supports it
How the video flows
+ Live Bridge
Glossary 2: what are Spout / Syphon?
A way to pass video between apps on the same computer.
SPOUT Windows
A Windows-only standard for sharing video. Send video to Spout-capable apps on the same PC, such as Resolume / TouchDesigner / Notch / Unreal Engine.
Popular apps
Resolume · TouchDesigner · Notch · Unreal Engine
SYPHON macOS
A macOS-only standard for sharing video. Send video to Syphon-capable apps on the same Mac, such as MadMapper / VDMX / Resolume.
Popular apps
MadMapper · VDMX · Resolume
NDI is the most versatile, so if in doubt, go with NDI. If the receiver supports only Spout or only Syphon, choose that one.
Glossary 3: what is OSC?
A messaging protocol for controlling Cinema 4D remotely.
Originally created to control music gear remotely, it's a light, fast messaging protocol. Today it's also standard in video, lighting and stage production.
For example, you can send commands like these
▶ Start playback
🎥 Switch the camera
💡 Make this light red
🎚️ Set the value to 0.5
What can OSC do? — five typical examples
| OSC address | Function |
|---|---|
/c4d/play · /c4d/stop | Play / stop (/c4d/toggle toggles) |
/c4d/camera/active | Switch camera |
/c4d/var/<name> | Change a User Data value |
/c4d/take | Switch Take (by Take name) |
/c4d/frame | Jump to a specific frame |
Many more addresses are available, such as marker jumps / shading switching / LIVE streaming on/off / messages in the status bar. For the full list, use "Open OSC Reference (in browser)..." at the bottom of the OSC tab.
Glossary 4: what is MIDI?
The standard protocol that music gear uses for input from hardware controllers.
The signal that carries what you do on off-the-shelf knobs, sliders and pads into Cinema 4D.
Originally a standard for connecting music gear, it's now widely used for input from external controllers in all kinds of settings, including video, lighting and stage production.
Typical uses
- Control light intensity and color by hand with knobs
- Switch cameras instantly with pads (live VJ)
- Play back animation by hand with sliders
Supported MIDI gear
Works with almost any MIDI controller on the market. Just connect it to your computer over USB.
| KORG | nanoKONTROL / nanoPAD, etc. |
| AKAI | MIDIMIX / APC mini, etc. |
| Novation | Launchpad / Launch Control, etc. |
| Behringer | X-TOUCH, etc. |
Troubleshooting — FAQ
QNo video shows up at the NDI receiver
- Check that the sender and receiver are on the same Wi-Fi / LAN
- Windows: allow Cinema 4D and the receiving app through the firewall (Windows Security) on private networks
- macOS: allow Cinema 4D and the receiving app in System Settings → Privacy & Security → Local Network. If it's already on but nothing arrives, turn it off, restart the Mac, then turn it on again
- Wake up any computer that is asleep
QI can't send NDI from After Effects
After Effects can't send NDI out of the box. Download and install NDI Tools (free) from the official NDI site.
- Download: ndi.video/tools, free for personal and commercial use
- After installing, in AE's Preferences → Video Preview, turn on "Mercury Transmit" and choose NDI as the output
- Once sending starts, "COMPUTER-NAME (Adobe After Effects)" appears in the source list of C4D's VIDEO IN tab
- If it doesn't appear, check that AE and C4D are on the same Wi-Fi / LAN and that NDI is allowed through the firewall
QI can't connect to the Web Controller
- Check that Web Controller: Enable is on in the OSC tab
- Check that the phone and computer are on the same network
- If the computer's IP address has changed, reopen the panel (or turn "Enable" off and on again) to get a new URL / QR code
- If the browser shows "Access key required", open the Web Controller again from the latest URL / QR code shown in the panel (after "URL Reset", old URLs no longer work)
- Keep the panel open while you use the Web Controller
QThe plugin doesn't show up in C4D
- Check that you copied the whole C4D_Live_Bridge folder
- Copying only the
.xdl64/.xlibfile won't work - Check that Cinema 4D is 2026.2 or later (the plugin doesn't load in 2026.0 / 2026.1)
- Check that you copied it into the
2026_XXXXXXXXfolder you actually use (Preferences → "Open Preferences Folder...")
QMy MIDI controller isn't recognized
- Press the Rescan button (reopening the panel also refreshes the list)
- If that doesn't help, connect the MIDI device over USB first, then restart C4D
QThe viewport is choppy
- Set Stream rate to 30 fps
- (Windows) Lower Resolution to 50% (balanced)
- When Scope is "Render area", the image is sent at the Render Settings resolution. Large sizes such as 4K increase the load, so review the Render Settings resolution or switch to "Viewport"
QNDI, Syphon or Spout: which should I use?
- Choose what your receiving software supports
- Within the same computer, use Spout (Win) / Syphon (Mac); to send to another computer, use NDI
- If in doubt, NDI is fine (by default both are sent at once)
QOn macOS, pressing LIVE shows "LIVE stopped (capture failed)"
Screen recording permission is missing. Turn Cinema 4D on in System Settings → Privacy & Security → Screen & System Audio Recording (you may need to restart Cinema 4D).
QOn Windows, "SpoutDX.dll was not found" appears
Some of the plugin's files are missing. Reinstall the whole C4D_Live_Bridge folder. If you're in a hurry, set "Output" in VIDEO OUT to NDI to stream without Spout.
QStreaming doesn't stop when I close the panel
Closing the panel doesn't stop LIVE. Reopen the panel and press LIVE to stop it.
About
A plugin that sends Cinema 4D video out, brings outside video in, and lets you control Cinema 4D from outside.
| Author | Taichi Teramura |
| Distribution | mojon.gumroad.com (Gumroad) |
| Website | clb.taichi-teramura.com |
| Version | v1.0.0 / English Edition |